By taking 3 screen shots of the different screens of the app Find Sums and adding the chart, I created this Page and then saved it as a word document. I printed it out for each child (and a couple of extra for when I have a student transfer in) and stapled it inside a file folder. The color of the file folder corresponds to the color of their homework folder which corresponds to the cubbie that they keep their coat and bookbag in.
Specifically, here is what I did.
- I took three screen shots. I upload them to the Mac.
- I highlighted them in iPhotos and then dragged them to the desk top.
- I had to rotate them left (go to Tools, rotate left and then save).
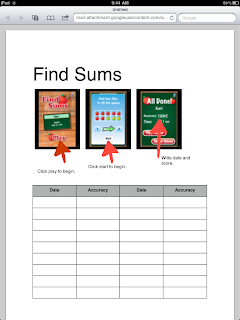
- I then opened a Pages and dragged the desktop image (IMG_010.PNG, an example of the image) to the Pages.
- I clicked Shapes (located at the top of the page, it is a green icon) and scrolled down to the arrow. You can change the angle of the arrow by clicking the end of the arrow and moving it. You can change the size of the arrow by clicking 2pt. I changed mine to 10. You can change the color of the arrow by clicking the black box located to the left of the 2 pt scroll box. I changed my color to red. I also changed the style of the arrow by clicking Endpoints: scroll box.
- To insert the text ("click play to begin"), I clicked Text Box (located next to the green Shapes. I typed in my text. I did this for each picture/arrow.
- Finally, I inserted the table. I filled in the table with date and accuracy.
The students will fill in the date and the accuracy. For older students they could also fill in the time (or fluency) of completing the exercise. My students currently show me the accuracy percentage before they begin another game. Our school goal is 90% so we have related that goal to this one. When a student completes the activity with lesson than 90% we talk about what we can do to achieve 90%. The percentage can assist me in determining what they are actually doing while they play Find Sums. A very low percentage tells me they are probably just pushing the numbers and not really "learning" anything. I would then watch them do the app to help and explain and give immediate feedback on what they are doing.

